Showing posts with label bread. Show all posts

Tuesday, February 25, 2014

Gluten-Free, Grain-Free Biscuits {Paleo}

These biscuits are my attempt to find a tasty warm "bread" for my hubby to enjoy with all the soups and stews I make.  These are gluten-free and grain-free, which is what he prefers, so they are more dense like a biscuit. You can detect a hint of coconut from the coconut flour but we are used to it and like it now.  If you are looking to try a grain-free option or perhaps you are entertaining for someone who avoids grain, gluten and dairy, this is one to try.  You can double the recipe to make about 1 dozen and you can still fit them all on one baking sheet because they do not rise during baking.  Enjoy!

Recipe: (makes 6-8 biscuits)
Ingredients:
3/4 cup Coconut Flour
3/4 cup Tapioca Starch (Flour)
1 teaspoon salt
1 egg
3/4 cup warm water
1/4 cup Avocado Oil

Directions:
1. Preheat oven to 350'F.  In a mixing bowl combine the dry ingredients; coconut flour, tapioca starch and salt
2. In a separate bowl combine wet ingredients. Whisk the egg and add in the water and oil.


3. Pour wet ingredients over dry ingredients and gently stir until combined.  If too dry, add 1 more tablespoon of water.

4. Scoop about an ice cream scoop size amount of dough into your hand and gently roll into a ball.

5. Place biscuits on a Silpat-lined baking sheet and bake at 350'F for 33-35 minutes or until biscuits are a deep golden all over. {cooking times will vary, you are looking for a deep golden color.  When doubling the recipe I typically add 2-4 minutes to the cook time}


6. Enjoy plain or with a drizzle of honey!


*This post contains affiliate links
...click here for the recipe!

Saturday, December 17, 2011

Banana Bread {Gluten Free, Dairy Free}

It's been awhile since we've had banana bread so I was excited that my hubby wanted to make some. He came up with this recipe and you'd never guess it's gluten free and dairy free! It was so moist and dense and flavorful and the whole loaf was eaten in one day, yum! You may also like to try our Low Fat banana bread or our Low sugar, Vegan banana bread. Enjoy!

Recipe: (makes one loaf, 10-12 slices)
Ingredients:

{dry ingredients}
3/4 cup white rice flour
3/4 cup tapioca flour
1 cup sorghum flour
1/2 cup millet flour
1 Tablespoon xanthan gum
1/2 teaspoon baking soda
1-1/2 teaspoon baking powder
1 teaspoon salt

{wet ingredients}
3 ripe bananas, peeled and mashed
1-1/2 teaspoons vanilla
3 Tablespoons unsalted butter, softened (or use 2 Tablespoons of vegetable oil for dairy free)
1 1/3 cups oat milk
3/4 cup sugar
2 eggs

extras: 1 cup walnuts (optional)

Directions:
1. Pre-heat oven to 350'F.
2. Whisk dry ingredients together in a large bowl. In a separate bowl or stand mixer, beat wet ingredients together until well combined.
3. Slowly (by the 1/2 cup) add the dry ingredients into the wet with your mixer on low speed.
4. Gently fold in walnuts by hand with a spoon. Pour the batter into a greased loaf pan (about 9"x5" size), or use a Stoneware loaf pan like us, then no cooking spray is needed. Bake at 350'F for 60-70 minutes until it reaches an internal temperature of 170'-200'F and a toothpick inserted in the center comes out clean. Let cool for 5 minutes and then enjoy.
...click here for the recipe!

Friday, April 22, 2011

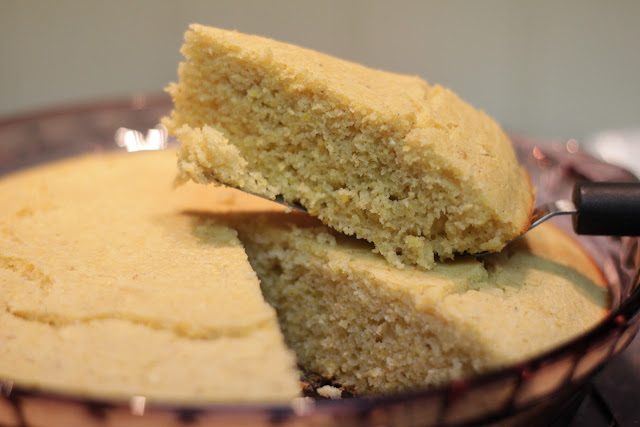
Cornbread {Gluten Free}

As you may have noticed we have been cooking more gluten free dishes lately that's because my hubby has been eating gluten free for the last 3 months, trying to rule out an intolerance. One thing I set out to perfect was a gluten free cornbread. I love cornbread and after several attempts of trial and error I found a winner, at least in my book. It's flavorful with a great light crunch from the cornmeal and still soft and moist, a characteristic hard to come by in the gluten free world. It's also fairly light so go ahead and have two pieces, or like me, have three.  Enjoy!

Recipe: (Yields 12 slices)
Ingredients:
1/2 cup white rice flour
1/2 cup sorgum flour (*if you don't have this you can use 1 cup total of white rice flour)
3/4 cup stone-ground cornmeal
2 Tablespoons of sugar
2 1/2 teaspoons baking powder
3/4 teaspoon salt
2 Tablespoons Buttermilk powder
1 cup water (*if you don't have the buttermilk powder you can use 1 cup milk or 1 cup buttermilk and leave out the 1 cup of water)
2 eggs
1/4 cup canola oil

Directions:
1. Preheat oven to 400'F. In a large bowl, combine the dry ingredients (except buttermilk powder), whisk to combine.
2. In a 2 cup liquid measuring cup pour 1 cup water and mix in buttermilk powder, (again if you'd rather use 1 cup of liquid milk or buttermilk that will work great, I was trying to reduce the lactose).
3. To the buttermilk add the eggs and oil, beat lightly with a fork to combine.
4. Add wet ingredients to the dry ingredients, stir well until moistened and pour into a glass pie pan coated with cooking spray. Let pie pan rest on counter for at least 5 minutes before baking, this helps thicken it and makes for a nice texture.
5. Bake for 15-20 minutes or until a toothpick inserted in the center comes out clean and the edges are golden. Slice into 12 wedges and serve hot with your favorite soup, stew or chili.
...click here for the recipe!

Wednesday, January 5, 2011

Pesto Pasta with Garden Vegetables and Balsamic-Caramelized Onion Bread

What a tasty dinner to come home to tonight, made by my hubby. A delicious blend of fresh vegetables, grilled chicken and whole wheat pasta all tossed in a garlicy pesto sauce. No real recipe required here, but inspiration all the same. Empty out the vegetable bin in your fridge, we used, bell pepper, zucchini, spinach, carrots, and red onions, grill up some chicken, toss in your favorite sauce and sprinkle with Parmigiano-Reggiano cheese! Check out "The Bread Lover's Bread Machine Cookbook" for the bread recipe. ...click here for the recipe!

Saturday, December 11, 2010

Pumpkin Pie Bread

This is a quick bread my hubby made that tastes a lot like pumpkin pie. It's even better when served the next day.

Back in October I took my boys to the Pumpkin Patch for the Preschool fieldtrip,
we came home with a beautiful blue pumpkin.  

We never carved it so in early November we chunked it up, baked it {scoop out the seeds and place cut side down in a large glass baking dish, bake @ 350'F for 20-40min until tender} 

 
and pureed it in the food processor into beautiful orange puree.  
Would you believe it made nearly 12 cups of puree?


We used up some more of that homemade pumpkin puree for this recipe.  The mini muffins were a hit at my son's Preschool snack time this week. This recipe makes either two 9x5 loafs or one loaf and 48 mini muffins. Another fun use for our trusty mini muffin tin. Enjoy and try getting the kids in the kitchen to help.

Recipe: makes 2 (9x5) loafs OR one (9x5) loaf and 48 mini muffins

Ingredients:
3 1/2 cups all-purpose flour (may need up to 4 cups)
2 teaspoons baking soda
1 teaspoon baking powder
3 teaspoons pumpkin pie spice
1 teaspoon salt
3 cups white sugar
1/2 cup vegetable oil
1/4 cup Plain yogurt
4 eggs
1 (15 ounce) can pumpkin puree (or ~2 cups homemade pumpkin puree)
1/2 cup water
1/2 cup walnuts, optional

Directions
1. Preheat oven to 350' F. Spray two 9x5 inch loaf pans with cooking spray (or prepare mini muffin tin if using), not necessary to spray Stoneware pans. Sift dry ingredients together; 3 1/2 cups of flour, the baking soda, baking powder, salt, and pumpkin pie spice. Set aside.

2. In a large bowl, beat together sugar, oil, yogurt, eggs, and pumpkin puree. Add dry ingredients 1/2 cup at a time, add the water. If your pumpkin puree is thin you may need to add up to 1/2 cup more flour here until you get a cake batter type consistency. Stir in walnuts if using. Divide batter evenly between the prepared pans, use a tablespoon to fill the mini muffins about 3/4 full.

3. Bake for 1 hour-1 hour, 10 minutes for a loaf size, 10-14 minutes for mini muffins or until a toothpick inserted into the center comes out clean. Store wrapped in plastic wrap at room temperature.
...click here for the recipe!

Friday, November 5, 2010

Another Take on Banana Bread

This is a low sugar, vegan banana bread (Dairy-free, Egg-free)** and yes, it's actually still quite tasty. It's more in the realm of a bread than the traditional cake type banana "bread". I like both varieties but decided to try something new! Try it out, it's a wonderful way to use up some over ripe bananas. Here's my other banana bread recipe if you're interested.

Recipe: (yields 10-12 slices)
Ingredients:
1 cup whole wheat flour
1 cup All-Purpose flour
1/2 teaspoon ground nutmeg
1 1/2 teaspoons Baking Soda
1 teaspoon ground cinnamon
1/4 teaspoon salt
1/2 cup Orange Juice (or you may use plain soy milk, rice milk, etc)
2 Tablespoons ground Flaxseed (you can buy it already ground as "flaxmeal")
1/4 cup Canola or Vegetable oil (you could substitute this with 1/4 cup of applesauce too)
1 teaspoon vanilla
2 Tablespoons light brown sugar
3-4 over ripe bananas, mashed (~ 2 cups)
1/2-3/4 cup walnuts (depends on how nutty you're feeling; could also add dried fruit)

Preheat oven to 350'F, Spray a 9x5-inch loaf pan* with cooking spray
(*or you may use a Stoneware loaf pan which requires no spray)

Directions:
1. In a medium mixing bowl, combine the flours, nutmeg, baking soda, cinnamon and salt, whisk gently to combine.

2. In a second large mixing bowl combine the Orange Juice and flax meal. Stir the oil (or applesauce), vanilla, brown sugar (if using) and bananas until well mixed.

3. Stir the dry ingredients into the wet by hand just until combined, don't over mix, it will be lumpy. Add nuts (and/or dried fruit), fold in. Spread batter into loaf pan and bake for 30-35 minutes (if you add extra bananas it may take up to 40-45 minutes), bake until the top is browned and a toothpick inserted comes out clean. After a few minutes, remove loaf from pan and let cool on a wire rack.

Banana Tip: My boys and I love bananas but more often than I'd like there are one or two that ripen alittle too much before we can eat them.  Rather than toss these, I bag them up in a zipper top bag and freeze them.  When I'm ready to make banana bread, I pull the frozen bananas out and let them soften at room temperature about 1 hour or float the plastic bag in a bowl of warm water until the bananas are soft, then I add them to my recipe!

Mini-Loaf Option: This recipe will make four mini-loaves, bake in a 350'F oven for ~ 20-25 minutes or until golden and a toothpick comes out clean.
...click here for the recipe!

Tuesday, September 28, 2010

Strawberry Mini-Scones

My awesome hubby loves to bake and he found yet another use for our new mini-muffin tin! I love this tin (click here to see what it looks like). As you may recall I used it to make some delicious mini turkey meatballs awhile back, as well as muffins and now, scones. We were having fun calling them "sconies", "minis" or even "sconitas".

Just take J's original recipe found here and substitute in the fruit of your choice, here he used organic strawberries (remember you can use frozen berries too).

Then place in the mini muffin pan and bake until golden brown and a toothpick inserted in the center comes out clean (~9-12 minutes) 

...click here for the recipe!

Wednesday, September 8, 2010

Breadcrumbs - How to make your own

There is nothing like homemade bread crumbs to improve the taste of your dish and fresh homemade bread crumbs are so easy to make! This also saves money since store bought bread crumbs can be pricey. I like to use whole wheat bread, which has alot of great fiber! Save those end pieces from your loves of sandwich bread, you can stash them in the freezer in a resealable plastic bag until you have enough to make a batch of breadcrumbs.

Any type of bread (white, wheat, sourdough, rye, etc.) can be used. There's nothing wrong with combining various breads; why let them go to waste? The mixture of various breads also gives your dishes some wonderful taste! Avoid using stale bread as it makes for stale tasting breadcrumbs.

If your bread is too fresh, just bake fresh bread slices in the oven until slightly dry. You will get a better drying result in the oven rather than the toaster. Place bread piece/slices on an ungreased baking sheet, or directly on the oven rack. Allow a bit of room between pieces to dry properly. Bake in a 300'F oven for approximately 10 to 15 minutes; flip halfway through. Remove from oven and let cool.

Slice dried bread into smaller pieces and place in your food processor.  Pulse about 30 seconds or until desired coarseness.

Store in an airtight container to preserve freshness. Add your homemade breadcrumbs to meatloaf, as a topping for a casserole, for breaded chicken or fish or even as a garnish on top of soup. Get creative! Let us know about your favorite recipe that incorporates breadcrumbs.
...click here for the recipe!

Thursday, May 20, 2010

Banana Bread

I've been attempting to post at least one recipe here everyday since we started this blog and I realized today that we have had something different every night for the last 3 weeks! Wow, this blog IS helping us be more creative and saving us money, since we haven't eaten out! Tonight we re-visited the Balsamic Mushroom Chicken and it was still good.

So I leave you with another yummy item I made today with the help of my 3 year old son...Banana Bread. My little guy had a fun time smashin' up all the ripe bananas too! Here's my Vegan, very low sugar banana bread recipe too if you're feeling adventurous.

Banana Bread recipe: (yields 10-12 slices)
3/4 cup sugar
1/4 cup butter, softened
1/4 cup no sugar added applesauce
1/2 cup Egg Beaters (or 2 whole eggs)
1 1/2 cups mashed very ripe bananas (~3 medium)
1/2 cup fat free milk (or low-fat buttermilk)
1 teaspoon vanilla
1 1/2 cups all-purpose flour
1 cup whole wheat flour
1 teaspoon baking soda
1 teaspoon salt
1+ cup chopped nuts, optional

Directions
1. Preheat oven to 350'F and spray a loaf pan with cooking spray (or not if you're using a stoneware loaf pan like me)
2. in a large bowl or stand mixer, mix sugar, butter and applesauce, add Egg Beater's (or eggs) stir until blended. Mix in mashed bananas, milk and vanilla; beat until smooth, about 1 minute. Add in flour, baking soda and salt just until moistened, don't over mix. Finally, mix the nuts in stirring gently by hand to combine.
3. Bake for about 60-75 minutes, or until golden and toothpick inserted in center comes out clean. Allow to cool about 10 minutes then carefully remove loaf and let it continue to cool on a wire rack.

**Edited to add: I also like to bake this recipe off in 4 mini loaf pans; perfect for gifting.  Bake at 350'F for 30-35 minutes, or until golden and a toothpick inserted into the center comes out clean.  Let cool, remove from pans and once completely cool, wrap in parchment paper and secure with baker's twine for an adorable and tasty gift. ...click here for the recipe!

Friday, May 14, 2010

Baked Pasta - an easy "to-go" meal


This afternoon I made a big batch of Baked Rigatoni (the store didn't have Ziti) so Rigatoni it was!  I brought dinner over to our friends after the birth of their second baby!  Congrats to Miss A and the fam!  I basically made two identical dinners and we ate the same thing!  This is a simple pasta dish with melted cheeses and lean ground turkey, baked until the cheese is toasty and golden brown.

I also made an attempt at homemade bread.  My hubby is much better at breads than me!  Instead of leaving it in the bread machine for the whole cycle, I opted to pull it out after the initial mix and do the rest by hand.  Knead, rest, knead, rest...you get the idea.  I think the bread turned out alittle under-done in the center (kinda doughy) but I had to pull it out before the tops burned.  Maybe a lower oven temp next time would work better.  :o)

For dessert I made brownies.  Since I can't bake without modifying it alittle, I substituted plain non-fat yogurt 1:1 for the oil, they were still quite tasty, I thought so anyway. ...click here for the recipe!


new posts sent to your email 

disclaimers

NOTE: The information on wholesomedinnertonight.blogspot.com is compiled from a variety of resources and is presented for educational purposes only. If you have questions or concerns regarding your physical or mental health, please seek assistance from a qualified healthcare provider.

Although this site includes links providing direct access to other Internet sites, wholesomedinnertonight.blogspot.com has not participated in their development, and does not monitor or exert any editorial control over these sites. Please review each website for their own privacy information.

Recipes listed as gluten free assume you are using gluten free ingredients when sauces or chicken stock, etc is listed. wholesomedinnertonight.blogspot.com has no control over where you get your ingredients, and which sources/brands of individual ingredients are used in your cooking. Thus we cannot guarantee that the end product you create will be gluten-free.

 
Related Posts Plugin for WordPress, Blogger...