These are fun and delicious! I roasted up some sweet potatoes and carrots with alittle olive oil, salt and pepper at 450'F for about 20-25minutes. Get the chicken started earlier in the day as it needs about 2-3 hours to marinate. Serve the chicken skewers up with some rice and a veggie side or a nice crisp green salad.
{TIP}: When choosing limes from the market, choose ones that are bright green, have a slight give to them, smell "limey" and most importantly are heavy for their size, this way they'll be more likely to be nice and juicy with great flavor!
Recipe: (serves 4)
Ingredients:
Marinade:
1/4 cup Low-Sodium soy sauce
1/4 cup fresh lime juice (~1-2 limes)
2 tablespoons natural peanut butter
2 tablespoons garam masala
1 tablespoon brown sugar
2 garlic cloves, finely chopped
1/4 teaspoon crushed red pepper flakes
1/4 cup warm water
pepper
10-12 chicken tenders (or 5-6 chicken breasts, cubed)
fresh cilantro, chopped for garnish
wedges of fresh lime
Directions:
1. Whisk all ingredients except chicken in a large bowl. Set aside.
2. Skewer chicken tenders onto wooden skewers, leaving some space at each end. Lay skewers in a 13x9 glass baking dish and season with pepper. Pour marinade over chicken, turning to coat. Cover with plastic wrap and place in refrigerator to marinate for 2-3 hours.
3. Remove skewers from marinade and grill them over medium-high heat about 3-4 minutes per side, basting them with more marinade once, until they reach an internal temperature of 155'F. Discard any remaining marinade as it has raw chicken juice in it. Garnish chicken with fresh chopped cilantro and serve with lime wedges.
Dipping Sauce:
1/4 cup Low Sodium Soy sauce
2 tablespoons natural peanut butter
1/2 teaspoon lime juice
generous squirt of Sriracha sauce
Combine in a small bowl with a whisk until smooth and combined.
...click here for the recipe!
This is a another chicken dish, but spiced up in a new way! You'll want to let this chicken marinate for at least 2-3 hours to really infuse the great flavor. You can whip up the marinade in the morning for dinner tonight. Don't be deterred by the list of spices, check out your grocery store's bulk bins and remember that once you buy a new spice jar it will likely last you awhile and see you through many recipes. We served this tasty chicken along side some Napa cabbage slaw with apples and carrots and some toasted whole wheat pita bread. Enjoy!
Recipe: (serves 4)
Ingredients:
Marinade:
- 2 Tablespoons olive oil
- 4 Tablespoons lemon juice
- 2 Tablespoons fresh cilantro, chopped
- 1 garlic clove, finely chopped
- 1 teaspoon paprika
- 1 teaspoon ground coriander
- 1/2 teaspoon ground cumin
- 1/8 teaspoon chili powder
- 4 boneless, skinless chicken breasts
black pepper
Directions:
1. Whisk the oil, lemon juice, fresh cilantro, garlic, and spices in a large glass dish, set aside.
2. Season the chicken lightly with pepper and add to the dish, turn to coat. Let the chicken marinate in the dish in the fridge, covered, for 2-3 hours. Turn chicken over at least once during that time.
3. Remove the chicken and save the marinade. Cook the chicken on the grill and brush the marinade over it, discard any remaining marinade as it has raw chicken juice in it. Chicken is done when it reaches an internal temperature of 160'F (we like to pull ours off the grill at ~155'F and place on a plate and cover with foil, it will keep cooking to 160'F and this helps prevent it from drying out). Garnish with cilantro and serve with slaw and toasted flat breads.
Cabbage Coleslaw:
- 1/2 head of Napa Cabbage, chopped
- 3 medium organic carrots, shredded
- 1 medium organic apple, thinly sliced
Dressing:
- 1-2 tablespoons apple cider vinegar
- 1 tablespoon Agave Nectar
- juice of 1 lemon
- salt and pepper to taste
- 2 pinches of chili powder
- 1 tablespoon olive oil
Directions:
Place cabbage, carrots and apples (add any other veggies you think will taste good that you have on hand) in a large bowl, toss to coat. In a separate bowl, mix dressing ingredients together with a whisk, taste it, adjust seasoning as needed then drizzle over the veggies.
...click here for the recipe!
My awesome hubby loves to bake and he found yet another use for our new mini-muffin tin! I love this tin (click
here to see what it looks like). As you may recall I used it to make some delicious
mini turkey meatballs awhile back, as well as muffins and now, scones. We were having fun calling them "sconies", "minis" or even "sconitas".
Just take J's original recipe found here and substitute in the fruit of your choice, here he used organic strawberries (remember you can use frozen berries too).
Then place in the mini muffin pan and bake until golden brown and a toothpick inserted in the center comes out clean (~9-12 minutes)
...click here for the recipe!
This is a hearty pasta dish I modified from one I saw on one of my favorite cooking shows. I used whole wheat pasta for extra fiber and protein. The seasonings are delicious and really resemble a sausage flavor without the sausage. My hubby suggested I call this one, "I can't believe it's not sausage". The "sauce" is one you create, not from a jar, and part of the layering of flavor comes from infusing some stock with Saffron. Don't skip this step as it really makes the whole dish. Enjoy!
Recipe: (Serves 4)
Ingredients:
2 1/4 cups chicken stock
big pinch of saffron threads (about 24 threads)
1 medium size firm eggplant, diced very finely into cubes
2 small zucchini, diced very finely into cubes
2 medium garden fresh tomatoes, diced finely into cubes
Salt and pepper
3 tablespoons extra virgin olive oil
1 pound ground turkey
1 teaspoon Italian Seasoning
3-4 cloves garlic, finely chopped
1 small onion, finely chopped
2 tablespoons fresh thyme leaves, finely chopped, or 1 tsp dried thyme
1/4 teaspoon crushed red pepper flakes
1/4 cup fat free milk
1 pound short-cut pasta, whatever shape you like
Parmesan cheese for garnish
fresh basil for garnish, julienned
Directions:
1. Infuse your broth with the saffron; pour 1 1/2 cups of chicken stock and saffron threads in a small pot. Bring to a simmer to infuse and concentrate the flavor. (It will turn a beautiful deep orange color)
2. Meanwhile, peel the skin off the eggplant. Dice very finely into 1/8-inch pieces. Sprinkle with salt and reserve.
3. Place a large pot of water over high heat for the pasta.
4. Heat a large pan over medium-high heat and add the turkey and lightly brown while finely crumbling it into small bits with a wooden spoon. Season with Italian Seasoning, salt, pepper, garlic, onion, thyme and chili pepper flakes.
5. Squeeze any liquid from the eggplant, then stir it into the turkey. Add zucchini and tomatoes. Cook for about 10-12 minutes, stirring frequently until the vegetables are tender. Deglaze the pan with 1/4 cup chicken stock, stir a minute then add the reduced saffron-infused stock, about 1 cup. Stir in the milk and simmer over low heat while the pasta cooks.
6. Cook the pasta to al dente. Reserve 1/4 cup starchy cooking liquid, then drain and toss the pasta with the sauce, adding the liquid as necessary to combine. Toss for 1-2 minutes. Serve topped with freshly grated Parmesan cheese and some fresh basil for garnish.
...click here for the recipe!
I saw this recipe in my new
Cooking Light Magazine and decided to give it a try. I bumped up the vegetables and added zucchini, of course, but otherwise followed their recipe fairly closely. It was a delicious combination of spicy (curry) and sweet (sweet potato). I used an ice cream scoop to portion out the rice on top of the vegetables, rather than filling our bowls with rice with a topping of veggies; a fun presentation I recently saw
Rachael Ray do. This is a great one, don't be afraid to serve it up to your kids too, it's full of fun flavors!
Recipe: (serves 4)
Ingredients:
1 1/2 teaspoons olive oil
2 cups diced, peeled sweet potato
2 cups small cauliflower florets
1/4 thinly sliced yellow onion
1 1/2 teaspoons Curry Powder
1/2 teaspoon Red Pepper Flakes (optional)
3/4 cup Low-Sodium Chicken Broth (or Vegetable broth)
1/8 teaspoon salt
1 (15-oz) can chickpeas (garbanzo beans), rinsed and drained
1 (15-oz) can no-salt-added diced tomatoes, in their juices
2 tablespoons chopped fresh cilantro
1 cup of Jasmine rice cooked according to package instructions (I prefer to cook our rice in Low-Sodium Chicken broth rather than water for added flavor)
Directions:
Heat olive oil in large pan over medium-high heat. Add sweet potato to pan; sauté 3 minutes. Decrease heat to medium. Add cauliflower, onion, and curry powder; cook 1 minute, stirring mixture constantly. Add broth and next 3 ingredients (through tomatoes); bring to a boil. Cover, reduce heat, and simmer 10 minutes or until vegetables are tender, stirring occasionally. Top with scoop of Jasmine rice and sprinkle with cilantro. This would also be great with brown rice.
...click here for the recipe!
What a wonderful treat! My sweet hubby let me sleep in on Saturday and made a delicious breakfast with our 3 year old son. We had a ton of fresh Organic apples, more than we could have eaten so he decided to make apple filled crepes...awesome idea!! He is always impressing me with his gift of patience and his cooking is no exception. He and our son took the time to peel and slice up some apples and make a special breakfast treat together. Here is his recipe, I love that he used non-fat yogurt and flax. Enjoy!
Whisk dry ingredients in a bowl:
1 1/2 cups all-purpose flour
1 tbsp sugar
1/2 tsp baking powder
1/2 tsp salt
1 tbsp flax meal
Whisk wet ingredients in a separate bowl:
1 cup fat-free milk
1 cup water
1/2 cup plain nonfat yogurt
2 large eggs
1/2 tsp vanilla extract
Slowly mix dry ingredients into wet using a whisk. Batter consistency should be much thinner than pancake batter. Let the batter sit for 15 minutes (if you can wait).
Now for the filling. This time we tried apples. Any organic apple should work, just use them when they are almost ripe so they still have some tart flavor to them. Why organic? Organic fruits and vegetables have much more flavor than standard produce. This way the apple adds flavor as well as texture. Mix the following into a pot and cook over medium heat until apples are tender and yummy:
5 small organic apples peeled and thinly sliced
1/3 cup sugar
1/3 cup water
1 1/2 tsp cinnamon
1 1/2 tbsp butter
pinch of salt
As the apples cook let's get back to the crepes...
Heat up a large flat pan on medium-high heat and spray with canola oil or lightly grease with butter. Pour 1/2 cup of batter in the middle of the pan and quickly swirl the pan to spread the batter evenly around the pan. Make them as thin as you can but keep a consistent thickness so it cooks evenly. Flip the crepe once the it has changed color and is lightly browned on the under side. Lightly spray the top of the crepe with canola oil and flip. Once both sides are lightly browned put the crepe on a plate and place some filling in it and roll up.
Dust with powder sugar and enjoy.
...click here for the recipe!
As I was jetting through the grocery store aisles these corn tortillas jumped out at me and I decided to give them a try. They were on the natural foods aisle and they were delicious. I stuffed them with shredded chicken, warm pinto beans, cilantro, hot sauce and a sprinkle of cheese. The perfect pair with my Spanish Rice. Enjoy!
Recipe: (serves 6)
For the Rice
1 Tablespoon olive oil
1 cup uncooked rice (white or brown)
1 small white onion, diced
1 1/2 cups low-sodium Chicken Broth
1 cup water
1 can (15 oz) diced tomatoes in their juices
1 teaspoon Chili Powder
1/2 bell pepper, diced (red or green)
1/2 teaspoon salt
cilantro or green onions for garnish, chopped
1. Sauté rice, onion and olive oil in skillet over medium-high heat about 5 minutes, stirring frequently until rice is just golden and onions are tender.
2. Stir in remaining ingredients except for cilantro. Heat to boiling then reduce heat to low and cover. Simmer, covered about 20 minutes, stirring occasionally until rice is tender and liquid is absorbed. {NOTE} if you choose to use brown rice the cooking time will be closer to 45-55 minutes. Season to taste. Garnish with cilantro or diced green onions.
For the tacos
12 delicious corn tortillas, small
6-8 boneless, skinless, chicken breast tenders*
salt and pepper
1/4 cup cilantro, chopped
1/4 cup Low-Sodium Chicken Broth
1/2 teaspoon Cumin
1 can (15 oz) Pinto Beans, warmed in their juices
Jack cheese, shredded for garnish
1 avocado, sliced
hot taco sauce (optional)
1. Season chicken tenders lightly with salt and pepper and place in a saute pan over medium-high heat, cook, flipping a couple times until lightly browned and to an internal temperature of 165'F, remove from heat, place in a bowl.
2. Shred chicken by pulling it apart with two forks. Sprinkle with Cumin, 1/2 of the cilantro and the chicken broth and toss to combine. Taste and adjust seasoning or add more broth as needed.
3. Warm tortillas on a warm flat grill pan. Place a few tablespoons of chicken in each tortilla, a spoonful of warm pinto beans, a sprinkle of cilantro and cheese, hot sauce and a slice of avocado.
*Edited to Add: You could also use our Crock Pot Chicken recipe for the chicken in these tacos. Delish!
...click here for the recipe!
We're still trying to find ways to prepare zucchini and tomatoes from our garden. I decided to roast them in the oven along with some garlic and onion to really bring out their concentrated flavors. Garden fresh basil is the perfect tasty garnish.
Recipe: Serves 4
Ingredients
4 small zucchini squash, cubed
8-9 Roma tomatoes (about 4 cups), cubed and seeded
1 medium red onion, sliced
4 garlic cloves, chopped
2 Tablespoons olive oil
salt and pepper
1/2 teaspoon Italian Seasoning
8 ounces short pasta
2 tablespoons unsalted butter
1/4 cup grated Parmesan cheese, plus more for serving
1 cup fresh basil leaves, diced
Directions
1. Preheat oven to 450'F. Spread squash, tomatoes, onions, and garlic on a large rimmed baking sheet. Drizzle with olive oil, and lightly sprinkle with salt, pepper and Italian Seasoning; toss to coat.
2. Roast ~30 minutes until tender and golden. No need to turn them during cooking.3. Bring a large pot of water to a boil. Add pasta, and cook per package instructions, drain. Add roasted vegetables to the pasta. Mix in the butter and Parmesan and stir to coat. Serve warm garnished with basil and Parmesan cheese.
...click here for the recipe!
I recently started perusing the cookbook section at the library and have found it to be a fun way to experiment with new recipes with very little commitment. I adapted this recipe from one of my latest library book finds. We like to have a meatless dinner every now and then. I found the Polenta for a great bargain in the bulk bins at our grocery store. Our 3 year old son had a blast helping me scoop out the vibrant yellow grain and was excited to help cook and eat it, he even asked for seconds!
Recipe (Serves 4)
Ingredients:
1-2 tablespoons extra virgin olive oil
2 cloves garlic, minced
1 small onion, diced
2 carrots, finely diced
2 celery stalks, finely diced
1/2 red bell pepper, finely diced
1 cup baby bella mushrooms (crimini) sliced
1 cup fresh shiitake mushroom caps, sliced (you may also use dried Shiitake mushrooms, rehydrate per package instructions)
salt & pepper
Polenta
Polenta
5 cups water
salt
extra-virgin olive oil
1 cup yellow polenta (cornmeal)
1/4 cup Parmesan cheese, grated
1 tablespoon butter
1/4 cup fat free milk
Directions
1. Bring 5 cups of water to a boil, add a drizzle of olive oil and pinch of salt
2. Heat ~1 tablespoon olive oil in a skillet over medium-high heat, add garlic and onions and cook until translucent, ~1-2 minutes. Add carrot, celery, bell pepper and a pinch of salt and pepper, stirring, cook about 3 minutes. Add mushrooms, reduce heat to medium let saute about 10 minutes.
3. To the boiling water, SLOWLY add the polenta, whisking constantly to avoid any lumps. Add Parmesan cheese, milk and butter and lower the heat. Cook, stirring nearly constantly until the polenta gets thick and pulls away from the sides of the pan, usually about 20 minutes. Don't go too far from the stove, you'll need to stir the polenta often to avoid sticking/burning.
4. Serve hot polenta in soup bowls topped with mushroom ragout.
...click here for the recipe!
What to do with the leftover chicken from last night's Roasted Chicken? Hmm? Let's make soup. The chicken carcass can be boiled with veggies to make a tasty homemade chicken stock, which serves as a base for some Next Day Homemade Chicken Soup. I added some fun star shaped semolina pasta to ours, add any pasta or rice that you like *use rice if you are cooking gluten free*. The bread machine made some tasty crusty bread to go along side.
Ingredients:
1 chicken carcass
3 large carrots, chopped
2 stalks celery, chopped
2 cloves garlic, chopped
1 onion, quartered
1/4 teaspoon sea salt
1/8 teaspoon ground black pepper
1/2 teaspoon Italian Seasoning
water
cooked chicken from Roasted Chicken, ~2 cups
Directions:
Pick the carcass clean of meat and store in the fridge for later use. Cover the carcass with water in a large soup pot, add chopped garlic, onion, 2 carrots, 2 celery stalks and seasonings. You can add most any root vegetable you like, I even added the green carrot tops. Once broth has come to a boil, skim off any foam with a spoon and discard. Reduce heat to low and simmer for 2-3 hours.
Strain your stock and discard the bones and vegetables.
Take strained broth and place it back into a pot. Add the chopped chicken left over from last night's dinner, 2 carrots (chopped), 3 celery stalks (chopped) and your choice of herbs and rice or noodles. Simmer until the noodles and vegetables have cooked and soup is heated through ~ 15-20 minutes. *if using rice, cook it separately and add the cooked rice now. Remove from heat and serve with crusty bread for dipping.
...click here for the recipe!
After talking recipes with a friend, I felt inspired to try my hand at roasting a WHOLE chicken. It turned out great! I stuffed the bird with some wonderful aromatics to add great flavor and scent. I roasted veggies as a side dish in the same pan, easy and delicious. As an added bonus, you can use the left over meat and carcass to make homemade Chicken Soup the next day.
Recipe: (serve 4)
Ingredients:
1 (5 pound) whole roasting chicken
ground black pepper
sea salt (optional)
1 teaspoon Italian Seasoning
7-8 sprigs of fresh rosemary
1 small yellow onion, quartered
1 lemon, halved
3 cloves of garlic, cut in half
1 pound organic carrots, cut into chunks
1 pound small red potatoes, quartered
1 yellow onion, thickly sliced
2-3 Zucchini squash, cut into 2-inch chunks
Olive oil
Directions:
1. Preheat the oven to 425'F. Prepare the chicken by removing giblets, rinsing and patting dry.
Stuff the cavity of the bird with the aromatics; the rosemary, 1 quartered onion, lemon halves and garlic pieces. Drizzle olive oil over the bird and sprinkle it fresh ground pepper and Italian Seasoning.
2. Arrange chopped vegetables in a large roasting pan and drizzle with olive oil and pepper. Set the whole chicken on top of the bed of veggies. Go ahead and try other vegetables here too, parsnips, fennel, celery, mushrooms, zucchini, etc. {TIP} if you want to add a more delicate veggie such as zucchini, wait and add them when you have about 20 minutes of baking time left so they aren't overcooked.
3. Roast for 1 1/2 hours, or until the chicken reaches an internal temperature of 170-180'F at it's thickest part and the juices run clear. Remove from the oven and tent with foil to keep warm.
4. Remove the aromatics from inside the bird. Slice the chicken and serve with the vegetables. Your whole dinner is in one pan, or add a fresh green salad to go along side. Pick the carcass clean of meat and save in the fridge for later use. Also, save the carcass in a resealable plastic bag in the fridge. Stay tuned...tomorrow we'll make "Next Day Homemade Chicken Soup".
...click here for the recipe!
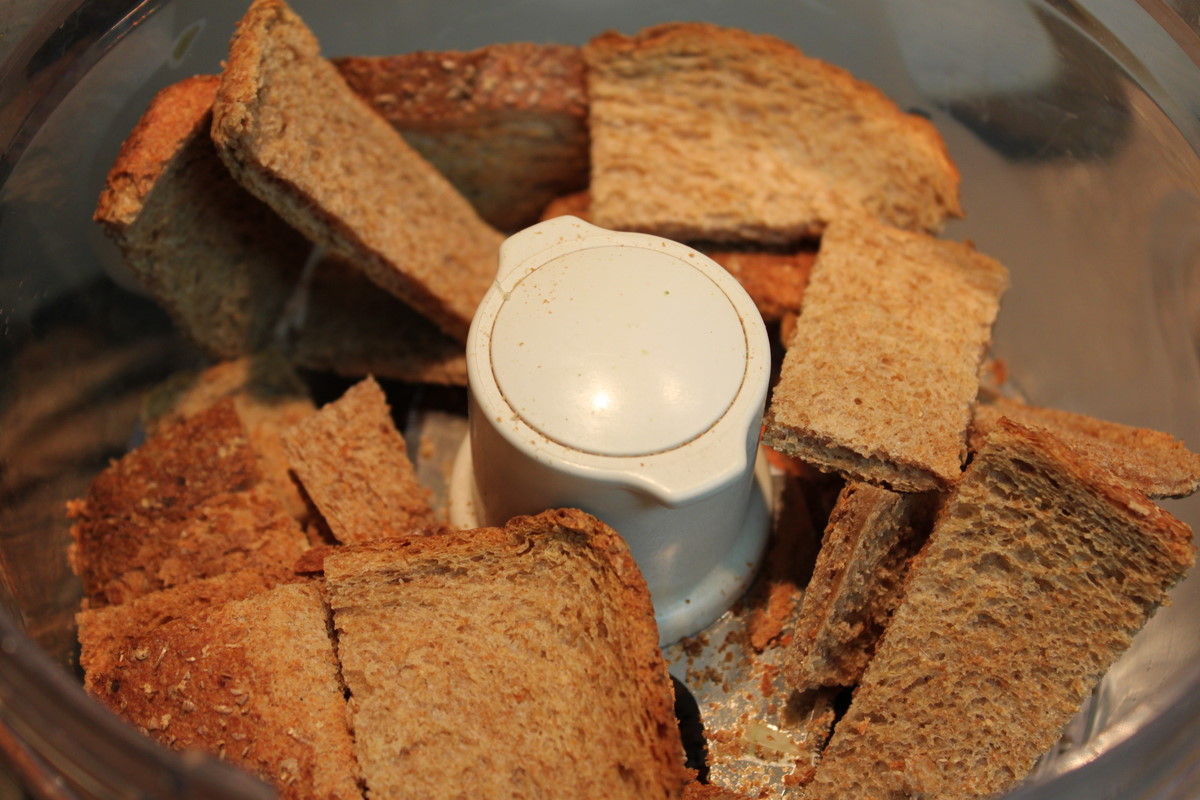
There is nothing like homemade bread crumbs to improve the taste of your dish and fresh homemade bread crumbs are so easy to make! This also saves money since store bought bread crumbs can be pricey. I like to use whole wheat bread, which has alot of great fiber! Save those end pieces from your loves of sandwich bread, you can stash them in the freezer in a resealable plastic bag until you have enough to make a batch of breadcrumbs.
Any type of bread (white, wheat, sourdough, rye, etc.) can be used. There's nothing wrong with combining various breads; why let them go to waste? The mixture of various breads also gives your dishes some wonderful taste! Avoid using stale bread as it makes for stale tasting breadcrumbs.
If your bread is too fresh, just bake fresh bread slices in the oven until slightly dry. You will get a better drying result in the oven rather than the toaster. Place bread piece/slices on an ungreased baking sheet, or directly on the oven rack. Allow a bit of room between pieces to dry properly. Bake in a 300'F oven for approximately 10 to 15 minutes; flip halfway through. Remove from oven and let cool.

Slice dried bread into smaller pieces and place in your food processor. Pulse about 30 seconds or until desired coarseness.

Store in an airtight container to preserve freshness. Add your homemade breadcrumbs to meatloaf, as a topping for a casserole, for breaded chicken or fish or even as a garnish on top of soup. Get creative! Let us know about your favorite recipe that incorporates breadcrumbs.
...click here for the recipe!
Have you ever tried Peruvian Beans?
We were recently introduced to them by our brother-in-law's family, and loved them. They are an oval-shaped dried bean similar to a pinto bean in appearance and flavor. They are mild flavored with a buttery taste and texture. We prepare them in the Crock Pot, which makes it SO easy. You can add these to soups, salads or as a stand alone delicious side dish. They can be found on the health food aisle of most grocery stores in the bulk bins, we found them at
Henry's Market.
{Tip}: They are even better the next day, so we like to prepare them the night before we plan to serve them for an even tastier result!
Recipe: (serves 8-10)
Ingredients:
3 cups dry Peruvian beans
4 cups Organic, Low-Sodium Chicken Broth
2 cups water
1 small onion, diced
3 cloves garlic, minced
3 small hot chili peppers (Serrano), leave whole, trim stems
juice of 1 lime
1. Combine all ingredients in large Crock Pot. To tame the heat of the chili peppers, but still allow them to impart their flavor, we leave them whole, just trim off the stems. If you prefer, you can always leave the peppers out all together.
2. Cook on Low heat setting for 6 hours, stirring occasionally. You'll know the beans are done when they are tender and slightly creamy. Remove chili peppers. Let cool on the counter ~ 30 minutes then cover with plastic wrap and transfer to the refrigerator overnight. The next day simply reheat and enjoy! We enjoyed ours with some tasty Chicken Enchiladas. You can also set these to cook on Low overnight (6-8 hours) but be warned you will smell them while you sleep. :-)
...click here for the recipe!
Well a teething 7 month old has left me especially exhausted in the evenings and heading to bed when I can. He's doing better today and thus I'm back to share another recipe.
This is a comfort food dish that I lightened up a bit and this time I've included the recipe. You can use just about any pasta you wish, I used Rigatoni. I also like to make this with whole wheat pasta or try half regular pasta and half wheat pasta if you aren't ready to use all wheat. You can really customize this dish and make it your own. We are still harvesting zucchini from our garden! I think we must have harvested about 45 zucchini from our one plant this year! I love zucchini but it's getting harder to find new ways to prepare it, luckily we have family and friends who have been nice enough to take some off our hands. You can dice up just about any favorite vegetable and add it to this dish. Also, for a more substantial entrée you can add some ground turkey!
Recipe: (serves 8)
Ingredients:
16 ounces ziti pasta, or other short pasta
3 medium zucchini, cubed (or substitute your favorite vegetable)
3 medium vine ripe tomatoes, diced (or another fav veg)
1 cup part-skim low-fat ricotta cheese
1 large egg, lightly beaten
1/2 cup finely grated Parmesan
1 cup shredded part-skim Mozzarella
1 jar (24 ounces) of your favorite pasta sauce; or you can always use homemade (~3 1/2 cups)
*optional* 3/4 pound lean ground turkey, cooked until no longer pink and fat drained
Directions
1. Preheat oven to 425'F. Bring a large pot of water to a boil. Cook pasta until al dente, about 1 minute less than the package instructions; drain, drizzle with olive oil lightly to prevent sticking and set aside.
2. Combine vegetables in a saucepan over medium high heat, drizzle with 1 Tablespoon olive oil.
Sauté until tender and cooked through, remove from heat, set aside. *If adding meat, add the cooked meat to the vegetables, set aside.
3. In a small bowl, combine ricotta, egg, 1/4 cup Parmesan, and half the Mozzarella
4. Spread about 1 cup of sauce in the bottom of a 2-quart casserole dish. Add 1/2 of the pasta and 1/2 of the vegetable (& meat) mixture. Divide the ricotta mixture in half and spread one half over the pasta and veggies using your fingers to dollop it around. Spread 1 cup of sauce over cheese layer. Repeat layers with remaining pasta, veggies (& meat), ricotta mixture and sauce. Sprinkle top with remaining 1/4 cup Parmesan and remaining Mozzarella.
5. Bake in a 425'F oven until cheese is melted and golden and sauce is bubbling, about 20-25 minutes. Serve with crusty bread and fresh green salad.
{Options}
To store in Refrigerator: Cover tightly with plastic wrap and refrigerate for up to 2 days. When ready to prepare, let casserole sit on counter top at room temperature for ~30 minutes before baking as above.
To Freeze: Prepare through step 4; cool to room temperature. Cover tightly with aluminum foil, and freeze up to one month. I suggest using a disposable container or lining your casserole dish with foil so that the casserole can be popped out once frozen solid, that way your dish isn't stranded in the freezer.
To Bake from Frozen: Preheat oven to 400'F. Bake, covered with foil, until center is warm, about 2 hours. Uncover, and bake until top is browned, about 20 minutes more.
To Bake from Thawed: Thaw overnight in the refrigerator. Preheat oven to 400'F and bake, covered with foil, until center is warm, about 25 minutes. Uncover, and bake until top is browned, about 10-15 minutes more. Every oven is different and cooking times may vary.
...click here for the recipe!
disclaimers
NOTE: The information on wholesomedinnertonight.blogspot.com is compiled from a variety of resources and is presented for educational purposes only. If you have questions or concerns regarding your physical or mental health, please seek assistance from a qualified healthcare provider.
Although this site includes links providing direct access to other Internet sites, wholesomedinnertonight.blogspot.com has not participated in their development, and does not monitor or exert any editorial control over these sites. Please review each website for their own privacy information.
Recipes listed as gluten free assume you are using gluten free ingredients when sauces or chicken stock, etc is listed. wholesomedinnertonight.blogspot.com has no control over where you get your ingredients, and which sources/brands of individual ingredients are used in your cooking. Thus we cannot guarantee that the end product you create will be gluten-free.