Thursday, December 26, 2013

Potato-Crusted Spinach Quiche {Gluten Free}


 Quiche is such a warm and satisfying dish and hearty enough to stand alone as your main entree.  We had this delicious quiche as our Christmas Eve dinner this year but it can work anytime of year.  We are in the process of preparing to relocate from California to Michigan and packing during the holidays meant this year had to be sweet and simple.  My hubby eats gluten free and since we eat dinner together as a family, our dinners are gluten free also.  Growing up my Grandma Oma ate gluten free and she loved this thin potato crust.  This was my first time making it and it was really easy!  My hubby also eats dairy-free so I just added some cheese to half of the quiche.  You can add cheese to the filling if you prefer and certainly can have fun playing with swapping out the fillings.  I'd like to try a sun dried tomato, spinach and goat cheese combo next. I'm also thinking of trying these in a cupcake pan for a tasty appetizer!  Merry Christmas and Enjoy!

Recipe:  {serves 4 as main dish, 6 as a side}
Ingredients:
2 medium Russet potatoes, peeled
1 cup cooked spinach
2-3 ounces Canadian bacon diced
1 clove garlic, finely minced
1-2 tablespoons diced red onion
4 eggs, well beaten
3/4 cup milk or water
1 tablespoon avocado oil (or other cooking oil)

Directions:
1. Using a Mandolin, thinly slice the peeled potatoes.  Or use a knife if you don't have a Mandolin.
2. Drizzle 1/2 tablespoon oil in bottom of a glass pie plate.  Layer potato slices all over bottom and sides of pie plate, slightly overlapping each slice.


3. Bake potatoes at 425'F for 25 minutes.
4. In a saute pan add 1/2 tablespoon oil and diced Canadian bacon and saute over medium heat for 5-10 minutes or until golden and fragrant.


5. Add garlic and onion and stir to saute.  Once onions and garlic are tender, add in cooked spinach to warm through.  Remove spinach mixture from the heat and allow to cool slightly.


6. In a large bowl mix together eggs, milk (or water), and cooled spinach mixture (if it's too hot it will scramble your eggs).

7. Remove potatoes from the oven and decrease oven temperature to 375'F.  Pour the egg and spinach mixture over the potatoes, smoothing evenly with a spatula.


8. Bake at 375'F for 30-40 minutes or until eggs are set.  Remove from the oven and let sit for 5-10 minutes before serving.  Top with cheese if you like.


*If you are a cheese eating family, go ahead and add a palmful of your favorite cheese to the filling!
For Diabetic Friendly, consider substituting Egg Beaters for the eggs for 1 CHO exchange, 3 Protein exchanges and 1.5 fat exchanges
...click here for the recipe!

Tuesday, September 17, 2013

Creamy Butternut Squash Soup {gluten-free, Vegan}

It's almost officially Autumn!  Yay for warm soups, stews and delicious slow cooked dinners...my favorite.  Seeing all the fresh squash in the market inspired me to make some tasty Butternut squash soup.  My hubby eats gluten-free and dairy-free so I was inspired to create a creamy textured soup without the cream.  An updated version of this.  This soup, with it's roasted fall flavors and a subtle sweetness from the squash, is a hearty and filling choice for dinner tonight.  The slow cooker will do most of the work for you.  Enjoy!

Recipe: (Serves 4-6)
Ingredients:

2 butternut squash (or 1 large squash)
1 large onion, chopped
3 celery stalks, chopped,
olive oil,
3 cloves garlic, finely chopped,
1 teaspoon poultry seasoning
1 1/2 teaspoons dried thyme
6-7 small red potatoes, quartered
6 cups water
1 1/4 teaspoons salt
salt and pepper to taste

*My hubby has also figured out that he has an allergy of sorts to carrots (via ALCAT) so I have left them out when I would have normally added them to create a Mirepoix.  I also can't use store-bought stocks anymore (because they contain carrots).  You can use homemade stock if you have it on hand or store-bought vegetable stock, just adjust the salt accordingly.

Directions:
1. Preheat oven to 350'F.  Slice butternut squash in half lengthwise and place cut side down in a large glass baking dish and fill with about 1 inch of water.  Bake @ 350'F for 20-30 minutes until cooked through (easily pierced with a knife)

2. In a large saute pan over medium heat add about 1 tablespoon olive oil.  Add diced celery, onions and garlic.  Saute over low-medium heat for 10 minutes until fragrant and soft.  

 3. Add in poultry seasoning, thyme and salt and stir to combine and lightly toast spices to bring out their flavor.  Add celery, onion mix to the slow cooker.

4. Wash and quarter potatoes and add them to the slow cooker.  Add 6 cups of water to the slow cooker.

5. Once the squash is cooked through, remove from oven and allow to cool for 15 minutes.  Carefully handle the squash with an oven mitt and scoop out the soft orange flesh with a spoon.  Add it to the slow cooker.

6. Cook on LOW heat in the slow cooker for 4-5 hours.  Turn off heat and blend soup using an immersion blender or working in batches blend soup in a blend or food processor until smooth.  Season to taste with salt and pepper and serve with a bright green salad.  We added some tasty sprouted pumpkin seeds for a crunchy bite.


...click here for the recipe!

Monday, September 16, 2013

Make your own crispy shells {Tostadas, Tacos, Chips}

This is a great way to enjoy crispy tortilla shells at home made from nothing more than simple corn tortillas.  Nothing added, no added preservatives to keep them crispy in a box.  And guest what?  It's super easy.  We use these crispy shells whenever we have tostadas, crispy tacos or simply want some warm, fresh chips!  Enjoy!

Ingredients:
fresh organic corn tortillas

Directions:
1. Preheat oven to 350'F.  
2. Place tortillas directly on oven rack, with enough space so that they are not overlapping


3. After about 5-7 minutes, flip them all over


4. When you start to smell a nice toasty corn smell they are done, about 5-7 minutes later.  The first few times you make your homemade crispy shells you'll want to stay nearby the oven and watch them until you are comfortable with your oven and figure out the time that works for you.  *All ovens are slightly different.

*To make taco shells, simply shape the tortilla into a taco shape and drop in between the oven rack grates.

...click here for the recipe!

Tuesday, August 27, 2013

Summer Vegetable and Chicken Stir-Fry {Gluten-Free, Soy-Free}

Trying to find a use for all those summer vegetables? Stir-fry is a great way to enjoy lots of great veggies! We've been using Coconut Aminos for awhile now as a soy-free alternative to soy sauce and they are so tasty. I like to bake the chicken as an easy alternative to grilling (I prefer to leave the grilling to my hubby, something to do with starting a small fire the last time I tried to grill 9 years ago). What easy dishes have you enjoyed this summer? Any new dinner ideas as we are welcoming fall and back-to-school?

Recipe: (serves 4)
Ingredients:
1 cup rice (uncooked)
2 cups water
1 bunch asparagus, chopped
2 zucchini, chopped
1 red bell pepper, chopped
1 package/bunch bean sprouts
1 package oyster mushrooms (or your favorite mushrooms)
1/2 red onion, diced
1/8 teaspoon garlic powder
1/2 cup cilantro, chopped
toasted cashews for garnish
olive oil
1/2 cup Coconut Aminos
3 chicken breasts


Directions:
1. Prepare rice per package instructions. (usually 1 cup rice with two cups water)
2. Preheat oven to 350'F. Place chicken breasts in a glass baking dish and pour 1/4 cup coconut aminos over the top. Bake at 350'F for 30-40 minutes or until they reach an internal temperature of 165'F. *Or you can cut down the chicken breasts into smaller pieces or use chicken tenders to shorten cooking time.

3. In a large pot add 1/2 tablespoon olive oil over medium-high heat.  Add mushrooms and onions first and saute.  After a couple minutes, add in the rest of your vegetables and 1/4 cup coconut aminos and 1/4 water, add garlic powder, saute over medium heat until veggies are cooked through but still bright and vibrant.

4. Once chicken is cooked through, remove from baking dish and thinly slice and mix in with vegetables.  Serve stir-fried vegetables and chicken over rice and if desired drizzle with a touch of Coconut Nectar sauce for a sweet finish and add a sprinkle of crunchy cashews.


...click here for the recipe!

Wednesday, July 24, 2013

Kitchen Tip: How to store chopped onions {no more smelly fridge}

Hello there!  Hope you are enjoying your summer as much as we have been.  I have a few new posts in the works for some great summer recipes we've been enjoying.


How to store that leftover chopped onion?  Usually, I wrap it in plastic wrap and stash it in the veggie drawer of the fridge but I can always smell that pungent onion smell when I open the fridge.  And I've had that dreadful experience of the onion imparting it's flavor onto other items in the fridge.  yuck.

The other night as I was chopping onions for our favorite Tostadas I had the idea to stash the remaining chopped onion in one of our mason jars.  We use mason jars for everything including as drinking glasses, love, love, love them!

It's the perfect airtight container.  No more stinky onion smell in our fridge and no more squished and banged up onions.  The glass jar doesn't absorb any odor at all like some plastic food storage containers may.  Go ahead and give it a try.  It's a simple tip, one of those Ah-Ha moments for me.  And I like that we are using less plastic!


...click here for the recipe!

Sunday, April 21, 2013

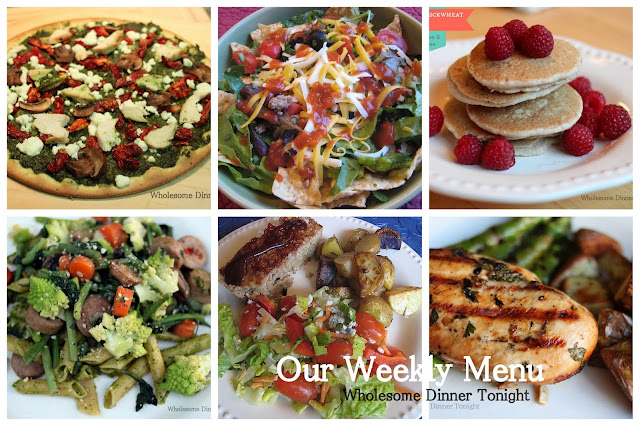
Our Weekly Menu {Gluten Free} 04.21.13

Hello sweet readers! Do you menu plan? Since we started intentionally menu planning, we are buying less, spending less, wasting less, eating out less and loving how much easier our weeknight dinner preparation has been! It takes the stress out of it for me, since I already know what I'm making.  My hubby and I plan the menu together with the kids interjecting their two cents. Keep checking back or Subscribe Via Email to have posts delivered free right to your inbox!

SUNDAY: Homemade Chicken Kale-Pesto Pizza with Sun Dried Tomatoes

MONDAY: Taco Salad

TUESDAY: Breakfast for Dinner; Millet Buckwheat Gluten Free Pancakes, bacon & fresh fruit

WEDNESDAY: Quinoa Pasta with grilled veggies and chicken sausage

THURSDAY: Turkey Meatloaf with Roasted Potatoes & steamed broccoli

FRIDAY: Cilantro Sesame Chicken with Wild Black Rice and veggies from our CSA box

SATURDAY: Family Birthday Party!

Check out all Our Weekly Menu posts for more ideas and inspiration.
Follow Wholesome Dinner Tonight on Pinterest where you can eat with your eyes!

I'm linking up with Jo-Lynne's, Gluten Free Weekly Meal Plan over at Musings of a Housewife
&

 Menu Plan Monday at orgjunkie.com

...click here for the recipe!

Thursday, April 18, 2013

Pistachio Encrusted Chicken & Wild Black Rice Salad {Gluten Free}


We love pistachios and their toasty, salty bite.  This is a new and different way to dress up your chicken for dinner tonight.  The pistachio crust gives it a rich and toasted depth of flavor without being too heavy.  We paired our tasty chicken with some nutrient-packed wild rice.  A light dressing and a few sweet, chewy pieces of dried fruit made it the perfect accompaniment to the chicken. Have you ever tried black rice before?  It does take awhile to cook but it's worth the wait.  Enjoy!
Recipe: (serves 4-6)
Chicken:
4-5 chicken breasts
1 1/2 cups pistachios (shelled) (roasted and salted preferred)
1/2 cup millet flour (or flour of your choice)
1/4 teaspoon sea salt
1 tablespoon coconut sugar (or sugar of your choice)
1 egg, white only
light olive oil

Chicken Directions:
1. Preheat oven to 350'F. Place chicken in a resealable plastic bag and pound until it's about 1/2-inch thick. Place the pounded chicken on a couple of paper towels to absorb any excess moisture.
2. In a small food processor or chopper, pulse the pistachios to a medium-fine consistency.
3. In a flat bottomed glass baking dish combine the pistachio pieces, flour, salt and sugar. In a separate dish add the egg white and whisk for a few seconds to loosen whites a little.
4. Dip each chicken breast into the egg white first, allow excess to drip off then gentle lay the chicken into the breading mixture, flipping to coat.
5. Place chicken on a baking sheet and bake at 350'F for 15-20 minutes, flippin gonce halfway through, or until chicken reaches an internal temperature of 165'F. Serve right away to enjoy that crispy, crunchy crust.


Wild rice salad:
1 3/4 cups wild rice {black rice}
4 1/4 cups water
1/2 teaspoon salt
the juice of 1 lime
2 teaspoon agave nectar<
1/3 English cucumber, diced
small handful of pistachios (roasted and salted preferred)
handful of dried cranberries
1/4 cup cilantro, chopped


Rice Directions:
1. Add rice and water to a pot over medium high heat and bring to a gentle boil. Once gently boiling, quickly reduce heat and simmer for 1 hr 15 mins until rice is split and soft. 2. Drain excess water, if any. Mix rice with rest of ingredients and serve warm or chilled.
...click here for the recipe!

Light and Fluffy Gluten-Free Cornbread

Have you been looking for a moist and delicious gluten-free cornbread recipe?  Today is the day!  This is my hubby's creation; the perfect blend of gluten free flours and slightly crunchy cornmeal come together to make a light and flavorful bread that actually holds together.  A slice of this goes perfectly with our Potato Kale Soup or Pumpkin Chili.  For an added treat we like to drizzle a bit of sweet local honey on top.  Enjoy!

Recipe: Makes one pie pan size cornbread loaf or 12 muffins
Ingredients:
dry mix:
3/4 cup medium grain organic cornmeal
1/2 cup rice flour
1/2 cup tapioca starch flour
1/2 cup millet flour
1 1/4 teaspoons sea salt
1 1/4 teaspoons xanthan gum
3 1/2 teaspoons aluminum-free baking powder
1/3 cup sugar

wet mix:
2 eggs*
3 Tablespoons light olive oil
1/2 cup water
1/2 cup apple sauce

Directions:
1. Preheat oven to 350'F.  In a large mixing bowl, combine dry ingredients.
2. In a separate bowl combine wet ingredients, mixing well.  Add wet ingredients to the dry ones, stir to combine.
3. Pour into glass pie dish coated with cooking spray and bake at 350'F for about 24 minutes or until slightly golden and a toothpick inserted in the center comes out clean.  If you prefer you can bake them as muffins at 350'F for about 15-18 minutes or until slightly golden and internal temperature is about 200 degrees.
*If you can't have eggs or you choose not to, try substituting 1 Tablespoon ground chia seeds with 1/4 cup water in place of each egg. For this recipe it would be 2 Tablespoons ground chia and an extra 1/2 cup of water to replace the two eggs. You can buy ground chia or grind it yourself in a blender, grinder or food processor. Make up a small batch and store in an airtight container so it's reading when you're baking.
...click here for the recipe!

Thursday, March 14, 2013

Cashew Lime Chicken Satay {Gluten Free}

This is a spin off from our Chicken Almond Satay with the switch up of a few things, namely substituting cashews for the almonds.  It turned out to be very tasty and nutty and the dipping sauce is just the right balance of savory and sweet.  This chicken pairs well with our fresh Vegetable Spring Rolls for a fun Make Your Own Take Out dinner at home.  Enjoy!

Recipe: (makes ~10 chicken tenders)
Ingredients:
10-12 chicken tenders

Marinade Ingredients:
1 cup water
3-4 Tablespoons lime juice (~2 limes juiced)
2 Tablespoons tamari sauce
1/4 cup cilantro, chopped
1 clove garlic
1/2 cup cashews
1 Tablespoon light olive oil
1/4 teaspoon roasted sesame oil
1/2 teaspoon sea salt

Dipping Sauce Ingredients:
2 Tablespoons water
1 Tablespoons lime juice (~1 lime)
1 Tablespoon tamari
1/4 cup cilantro, chopped
1/2 Tablespoon light olive oil
1/8 teaspoon roasted sesame oil
1/3 teaspoon sea salt
1/3 c cashews
7 Tablespoons packed brown sugar

Directions:
1. Combine all Marinade ingredients in a blender and blend until smooth.   Place chicken tenders in a large bowl and cover with marinade, for up to one hour
2. Remove chicken from marinade (discard marinade) and grill on a hot grill or grill pan, flipping once until it reaches an internal temperature of 165'F.
3. Combine all the dipping sauce ingredients in a clean blender and blend until smooth.  Serve along side hot skewers.


...click here for the recipe!

Sunday, March 10, 2013

Vegetable Spring Rolls {Gluten Free}


My hubby and I got to have a fun date day out a couple weeks ago for my birthday and one of our stops was at a fabulous Thai restaurant.  We ordered their fresh spring rolls and loved the crunchy fresh filling and chewy rice paper wrappers and tasty dipping sauce.  This is my husband's recreation of those and the whole fam loved them.  Serve them up with our Cashew lime Chicken Satay or Chicken Almond Satay for dinner tonight. Enjoy!
Recipe: (makes about 10 spring rolls)
Ingredients:
rice/tapioca paper "aka spring roll skin"
1 avocado, thinly sliced 
1 mango, sliced into thin matchsticks
4oz bean sprouts 
1/2 cucumber, sliced into thin matchsticks
2 medium carrots, sliced into thin matchsticks
4 large lettuce leaves, julienne
1/4 cup cilantro, chopped   

Dipping sauce:
equal parts agave nectar and fresh squeezed lime juice

Directions:
1. Submerge 1 paper in lukewarm water for about 5 seconds and place on a cutting board.  Place a second paper into the water again for about 5 seconds then lay the second paper on top of the first.  

2. Fill the roll as shown below with avocado, mango, bean sprouts, cucumber, carrots, lettuce and cilantro.


3. Roll it up like a burrito
4. Fold each side over then roll the rest of the way over.  The paper will stick to itself.


5. Repeat until you've used up all you tasty filling.  Slice each roll in half at an angle.  Serve with a drizzle of dipping sauce over the top.
...click here for the recipe!

Saturday, March 9, 2013

Millet Buckwheat Pancakes {Gluten Free, Dairy Free}


We have always enjoyed homemade pancakes around here thanks to my hubby's love of baking and enjoying hot breakfasts.  Homemade, as in not from a store-bought mix, taste great.  In the last few years he's been perfecting his recipe for a gluten free version, remember his delicious Pumpkin Buckwheat Pancake recipe?  The combination of ingredients in these are always changing (I think that's half the fun of it for him) and this will likely not be his last version but it's certainly worth sharing with you.  They have such a wonderful light and fluffy texture you may not even guess they're gluten free and dairy free.  He mixes up the dry ingredients in a large batch ahead of time, which we store it in large mason jars in the pantry, to speed things up in the morning.  This recipe is written so that you can make a double batch of the dry ingredients at a time.  Top with your favorite fresh fruit or berry puree (recipe coming soon).  Enjoy!

Recipe: (makes about 40 3-4" pancakes)
Ingredients:

coconut oil or butter for your pan

Dry Ingredients:
2 cups white rice flour
3/4 cup tapioca starch
1 cup buckwheat flour
2-1/2 cup millet flour
1-3/4 teaspoon sea salt
6 teaspoons aluminum free, GMO-free, baking powder

Wet Ingredients: 
2 Tablespoons light olive oil
1 egg (or egg substitute)
1 1/2 Tablespoons evaporated cane sugar
1/4 cup organic apple sauce
2 1/4 cup water

Directions:
1. Mix wet ingredients together in a large mixing bowl.
2. In a separate bowl, whisk together all the dry ingredients until well combined.  Divide dry mixture in half and save HALF of the dry mix for another day.
3. Add HALF of the dry ingredient mixture to the wet ingredient mixture, stir to combine.
4. Preheat a flat griddle over medium heat. Use a very light coating of coconut oil/butter on your griddle for every other batch of pancakes.


{Coconut oil doesn't add any flavor and it has a higher smoke point
 than other oils so it stays around instead of smoking/burning off}


5. Test to see if your pan is ready by flicking it lightly with water, if the water drips dance then your pan is hot and ready to use.  Pour with a 1/4 cup measuring cup into 3-4" pancakes onto the griddle.

6.  Cook for about 1 minute on each side or until just golden brown and flip-able.

7. Stack the pancakes in a pile so they can soften from the steam.  This makes them moist and just chewy enough to not know they are gluten free.

...click here for the recipe!

Wednesday, March 6, 2013

Farm Fresh to You, Capay Organic - CSA {Sponsored Post}

I wanted to share with you about our CSA (Community Supported Agriculture) that we've been enjoying for about 6 years now.  We use (California Based) Farm Fresh to You, Capay Organic.  
It's a great way to support local while eating tasty, seasonal, organic, nutrient-rich produce.  

Above you can see all the goodies in our box this week {the small "no cooking" box}
1 huge head of green leaf lettuce, 4 Fuji apples, 3 Naval oranges, 7 Murcott oranges, 2 Hass Avocados(that's right, 2!), 1 bunch Nantes carrots, 1/4 pound mushrooms & 1 huge Romanesco 
All delicious, all organic!

My favorite part?  

They deliver!  

That's right.  Their pricing includes delivery. With three kiddos 5 and under we love the convenience of stepping out our front door to find our box each week.  You can visit their website and see what's planned for the following week's deliveries, but we like to be surprised.   It's always fun to open up our box and see what's inside; like opening a present.  They offer office delivery too!

Have you tried a CSA before?  Are you worried, like we were, that you won't eat all the veggies in time?  I'd like to share some things we've learned that help us best utilize our CSA box...

1. Be mindful of your produce shopping before your box arrives.  
We like our produce drawers to be almost empty just before our box arrives with more goodies to fill them up.  This way you don't end up with more produce than you could possibly eat.  We certainly don't want any of it to go to waste; we see it has an investment in our family's long-term health.

2. Choose the box that's right for your family.  
We played around a bit with all the different offerings from Farm Fresh to You before 
settling on the combo that works for us and gives us the right amount of produce for our needs.  
Right now, for our family of 5 (3 little ones), we get a small box every week.  For fun and variety, we
alternate between the "small no cooking" and the "small mixed" boxes each week.  

3. Eat a fruit or vegetable (or two) at every.single.meal and snacks too!  
You may be surprised how quickly you can finish off all that yumminess!  Juice your produce or add it to a smoothie - greens too.  Rather than worry about making our produce last all week, 
we just start eating it, snacking on it and cooking with it right away.  
Fresher is always best.  You may find that you'll need to order a bigger box!

4. Edit your preferences
This, in my opinion, is such an awesome feature that Farm Fresh To You offers it's customers.  You can log-on their website anytime, 24/7, and edit your preferences and delivery schedule.  For example, we have a gorgeous lemon tree in our yard, so even though the Capay Organic lemons are great, we just don't need any more lemons.  With the click of a box I can add them to our "exclusions" list along with a few things I know my family just will not eat.  Also, if you're going on a trip or won't be around for a few days you can modify your delivery schedule, box type or delivery frequency. 
 Easy Peasy.  

5. Be adventurous, try something new!
Don't add everything you may be leery of to your exclusion list, try new things!  
In each Farm Fresh to You box you'll find an informative and entertaining letter that paints a picture of life on the farm and also includes a couple recipes to get your creative juices flowing with ideas on ways to prepare the items in your box.  Step out of your food comfort zone and have fun!


We recently added Pasture-Raised eggs to our delivery service and couldn't be happier!  
They have such rich, deep colored yolks and wonderful flavor!
Sure we'd love to have our own chickens someday, but for now, this is the next best thing.  

Interested in farm fresh produce delivered right to your door?  
Try Farm Fresh to You and get $10 off your first box with 
promo code "wdin"


...click here for the recipe!

Chicken Butternut Squash Taquitos {Gluten Free}

These are a fun spin-off from our original Chicken Taquitos.  We combined savory beans, juicy chicken and sweet, nutrient-packed, butternut squash, in a crispy baked shell, truly a scrumptious taquito!  The beans and squash add such rich flavor and keep the taquitos from drying out.  Make a bunch, dip in some yummy salsa or homemade guacamole, and serve them up with a crisp green salad for dinner tonight {and lunch tomorrow}.  Enjoy!


Recipe: (makes ~48 mini shell taquitos or 24 standard shell taquitos)
Ingredients:
4 boneless, skinless, chicken breasts {Prepare using our Crock Pot Chicken Recipe}
1 medium butternut squash {need ~ 1 1/2 cups of cooked squash}
1 (15 oz) can Vegetarian Re-fried Beans (or 1 1/2 cups Slow Cooker Pinto Beans, smashed)
1/2 cup fresh cilantro, coarsely chopped
the juice of 1 lime
1-2 tablespoons light olive oil
2 packages (24 each) "Taco Sliders" size Organic corn tortillas {We love MiRancho brand; GMO-free}

We used "taco sliders" size Organic corn tortillas (pictured right) 
or you could use standard taco size tortillas (pictured left) and the recipe will have about half the yield


Directions:
1. Get your Crock Pot Chicken started using 4 chicken breasts (recipe here), and allow at least 4 hours for it to cook {TIP: we like to start it in the morning, roll the taquitos during nap time then bake off at dinner}.  Once it's cooked remove chicken from broth and coarsely shred using two forks. {You can also cook the chicken a day ahead; drain the cooked chicken and store in the fridge}


2. Carefully slice butternut squash in half lengthwise and remove the seeds with a spoon.  Place squash, cut side down, in a large baking dish filled with about 1/2 inch of water.  Bake @ 350'F for 20-30 minutes until tender.  Allow to cool slightly then with a spoon, scoop out the bright orange flesh.  You will need about 1 1/2 cups of cooked squash for this recipe.

3. In a large bowl, add the shredded chicken, 1 1/2 cups re-fried beans, 1 1/2 cups of cooked squash, 1/2 cup chopped cilantro and the juice of 1 lime and stir until well combined.

 4. In flat bottomed skillet over medium-high heat add 1/2-1 T of light olive oil.  Once the oil is hot, place a tortilla on the skillet for about 5-10 seconds, only on ONE side.  This is to allow them to roll without splitting.

5. Remove the tortilla from the pan and place it, oiled side down, on the edge of a baking sheet with some of the tortilla hanging over so it's easier to grab the end.  Fill the dry side of the tortilla with about 3 tablespoons of the filling {more if using standard taco size tortillas} and gently roll into a taquito.

6. Bake 12-14 taquitos at a time spread out on a baking sheet, at 450'F for 15-18 minutes until golden and crisp.  Serve hot with fresh salsa and guacamole for dipping.


...click here for the recipe!


new posts sent to your email 

disclaimers

NOTE: The information on wholesomedinnertonight.blogspot.com is compiled from a variety of resources and is presented for educational purposes only. If you have questions or concerns regarding your physical or mental health, please seek assistance from a qualified healthcare provider.

Although this site includes links providing direct access to other Internet sites, wholesomedinnertonight.blogspot.com has not participated in their development, and does not monitor or exert any editorial control over these sites. Please review each website for their own privacy information.

Recipes listed as gluten free assume you are using gluten free ingredients when sauces or chicken stock, etc is listed. wholesomedinnertonight.blogspot.com has no control over where you get your ingredients, and which sources/brands of individual ingredients are used in your cooking. Thus we cannot guarantee that the end product you create will be gluten-free.

 
Related Posts Plugin for WordPress, Blogger...